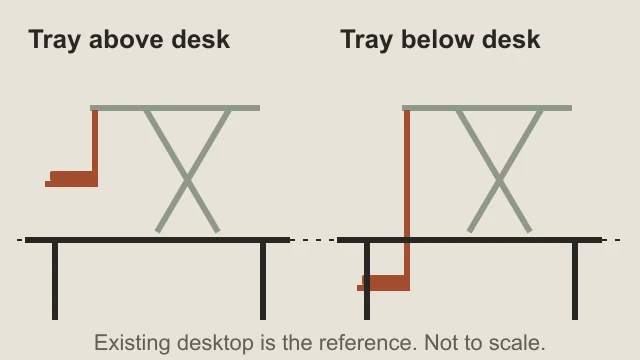
A standing desk converter lets you keep the desk you already own. The catch is what happens when you sit down again: even a low converter adds height, and its monitor platform's advertised range may tell you little about where your keyboard will land. Start with your seated typing position, then check standing height and the space the mechanism needs.
Quick answer
Keep the current setup: If your seated keyboard, mouse and screen already fit and you don't need standing computer work, buying nothing is a reasonable choice.
Add a converter: If both keyboard positions fit, the base is fully supported, the desk can carry the added load and the moving equipment clears everything around it.
Choose a full standing desk: If your current desk is too high for seated typing and a suitable below-desktop tray won't solve it, lacks usable surface or support space, or can't safely carry the converter. Verify the new desk's finished minimum height before ordering.
This is a research-backed fit guide, using manufacturer documentation checked October 1, 2026. We haven't hands-on tested these converters. The examples explain different layouts; they aren't a ranked list or evidence of stability, comfort or long-term reliability.
Measure seated keyboard height before standing height
Adjust your chair with your feet supported. Place the keyboard and mouse where you can reach them with relaxed shoulders, elbows near your sides and straight wrists. OSHA's keyboard guidance recommends evaluating these together and allowing leg clearance beneath a tray.
Measure from the floor to the top of the keys where you type, then measure from the floor to the top of the existing desk. Don't substitute your height or a generic desk-height chart for these measurements. Repeat the keytop measurement while standing in the footwear you actually use.
Measure the keyboard's thickness from its supporting surface to those keytops, including its feet or tilt setting. For a tilted keyboard, use the typing area you measured, rather than the highest decorative edge. A different keyboard or tilt setting changes the calculation.
Required keyboard-surface offset = target keytop height − existing desktop height − keyboard thickness.
All three measurements must use the same units. An offset of zero means the keyboard-supporting surface is level with the existing desktop; a negative offset means it needs to sit below that desktop.
For a hypothetical desk 29 inches high, a seated keytop target of 28 inches and a keyboard 1 inch thick give 28 − 29 − 1 = −2 inches. That person needs the supporting surface 2 inches below the desk. A converter whose lowest keyboard surface is above the desk won't meet that target. Raising the monitor doesn't fix it.
If the seated calculation fails, investigate a suitable below-desktop tray or a desk with a lower finished height. Recheck chair, foot support and knee space together before changing any one of them. Moving the keyboard off the converter every time you sit is an extra setup step, not proof that its tray fits.
Use the measurement worksheet
Enter your own desk and keyboard measurements below. Then enter the candidate's keyboard-surface minimum and maximum relative to your existing desktop, from its exact model's drawing or manual. Leave an unknown range blank; don't borrow the monitor platform's numbers.
Your keyboard-height worksheet
Use your own measured typing positions. Measure to the keys, then subtract the keyboard’s height to find the surface that must support it. No measurements are filled in for you.
Required keyboard surface relative to the desktop
Keytop target − existing desktop height − keyboard height above its support. A negative answer means below the desktop; a positive answer means above it.
1. Seated fit first
Enter the desktop height, keyboard height, and seated keytop target.
2. Standing height
Enter the desktop height, keyboard height, and standing keytop target.
This is a geometry check based on your entries, not a fit guarantee. Separate tray and upper-platform adjustments may constrain which positions are possible together. Confirm support, reach, movement clearance, stability, load limits, and comfort on the actual setup.
Take these checks to the product manual
- Base support: available flat desk width ___ and depth ___; converter base/contact footprint width ___ and depth ___. Check the entire base is supported as the manual requires. The upper platform size is a separate measurement.
- Keyboard and mouse: usable tray width ___ and depth ___; room for both devices ___; tray front overhang ___; seated knee clearance ___; comfortable reach in both positions ___.
- Movement: full raised and lowered envelope ___; clearance to wall/shelf/monitor arm ___; check the whole travel path, not only its endpoints.
- Cables: slack at full height ___; no snagging or pinch points ___; power supply and monitor-arm clearance checked ___.
- Upper-platform load: monitors, stands, laptop and anything else on the upper surface ___; documented upper-surface limit ___.
- Keyboard-tray load: keyboard, mouse and anything else on the tray ___; documented tray limit ___.
- Combined moving load: upper-platform load plus tray load ___; documented combined limit, if provided ___. Do not add separate limits to invent a total.
- Model-specific load rules: minimum lifting payload, if specified ___; monitor-mount weight limit, if specified ___; permitted mount position ___. Count the mount and monitors in the upper-platform and combined loads.
- Supporting desk: converter weight ___ plus everything the desk supports ___; desk load limit and any placement restrictions ___.
Use one weight unit throughout. Check upper-platform, tray, and combined limits separately. Your existing desk must also support the converter’s own weight.
The worksheet checks height geometry. It can't measure stability, reach, lifting effort or your desk's structural condition. A range match still needs the space, load and movement checks below.
Separate the upper platform from the keyboard tray
A converter can have one surface, two surfaces that move together, or a tray that adjusts independently. These are different fit problems.
| Layout | What to compare with your worksheet | Main limitation |
|---|---|---|
| Single surface | The surface's minimum and maximum above the existing desktop | Keyboard and display share the surface; it adds height even when lowered |
| Two tiers moving together | The keyboard tray's own endpoints, plus the fixed gap to the upper platform | A lower tray isn't automatically below the original desk |
| Independently adjustable tray | The tray's range at the converter positions you'll use, including any tilt | Upper lift and tray adjustment aren't interchangeable ranges |
| Full standing desk | Finished floor-to-desktop endpoints, plus keyboard thickness | Frame-only heights, a thicker top or casters can change the finished height |
Don't add a manufacturer's independent tray adjustment to its upper-platform lift and call that the keyboard's usable range. Check the diagram for which positions can actually be reached together. If the tray tilts, confirm your keytop target in the tilt setting you intend to use.
A laptop introduces another separation problem: putting its built-in keyboard at typing height also fixes the screen there. An external keyboard and mouse let you place the screen separately. For a monitor, check its own height adjustment after the keyboard position works; OSHA's monitor guidance places the top line of the screen at or below eye level, with exceptions for some eyewear.
Check the base, movement and mouse space
Measure the usable, flat support area on your desk, excluding rounded edges, grommets and obstructions. Compare it with the manufacturer's required support footprint. The upper work surface may overhang its base; its depth alone doesn't tell you the minimum supporting desk depth.
Tape out the base and the keyboard tray separately. Put your actual keyboard and mouse in the tray outline. Leave enough room to use the mouse beside the keyboard without reaching up to the original desk. Check the front edge, controls, chair arms and knees at the seated position.
Then check the whole movement path:
- Identify whether the converter rises vertically or sweeps forward/backward. Use its dimension drawing and operating instructions.
- Check the upper surface, monitor, arm, tray and handles against the wall, shelves and everything left on the original desk. Check intermediate positions as well as both endpoints.
- Confirm permitted device placement. A monitor arm adds clamp requirements, arm weight and leverage; a stated platform capacity isn't permission to mount any arm anywhere.
- Identify which screen moves with the keyboard. A monitor left on the original desk may need another height adjustment for standing use.
- Check every cable from moving equipment to the stationary desk, outlet or computer. Keep slack through the full travel and away from pinch points. Use the desk cable management guide before securing cables.
For a shallow desk, start with the support drawing, not a “compact” label. If the manufacturer doesn't give enough information to confirm support and movement clearance, get clarification before ordering. Our multi-monitor setup guide helps with the separate display-placement decision.
Treat each load limit separately
Write down the upper-platform load, keyboard-tray load, combined payload limit and any monitor-mount limit that applies to the exact configuration. Some products have only one rated surface; others split the load. A combined figure doesn't mean the entire amount can go on the upper platform.
Weigh or obtain the documented weight of the monitors with their stands, laptop, arms, keyboard, mouse and accessories you'll place on the converter. Check each surface separately, then any combined limit. Don't treat a keyboard-tray rating as extra capacity if it is already included in the combined rating.
The supporting desk carries the converter's own weight, all equipment on it, and everything still on the original desk. Compare that total with the desk manufacturer's applicable supported-load instructions. A converter's lifting limit doesn't establish the capacity of a glass top, a shelf, a damaged desk or its attachment points. Minimum payloads also matter on mechanisms that specify them.
Unknown desk capacity or converter weight means this check is unfinished. A dimensional match alone isn't a reason to load the setup.
Four converter examples to check against your measurements
Use these exact models to understand the tradeoffs. Follow the linked documentation for your selected version; a similar family name or a different width can have different limits.
UPLIFT E3 Compact: A light single-surface setup
The UPLIFT E3 Compact Standing Desk Converter, model UDA121, has a 26.8 by 13.4-inch work surface and a listed height range of 1 to 16.8 inches above the desk. Its single surface has an 11 lb lifting limit. UPLIFT lists the converter itself at 12.4 lb, which belongs in the supporting-desk load calculation. Manufacturer specifications and instructions.
This layout is worth checking for a light laptop and input-device setup when the extra inch at the lowered position fits your seated target. The E3 instructions call for 28 by 14 inches of clear desk space; don't replace that requirement with the smaller work-surface dimensions. Confirm your preferred typing height locks safely using those instructions; the advertised span alone isn't proof of a usable locked position.
Skip it if your seated keyboard needs to be at or below the original desktop, or your equipment exceeds the single-surface load. It has no separate keyboard tray. A separately placed monitor still needs a workable standing viewing position; a tray layout or a full desk may suit that job better.
VIVO DESK-V000U: A larger single surface
The black 29-inch VIVO DESK-V000U, exact Amazon item B07K8WZ19K, has a 29.3 by 17.8-inch upper surface, a 26.1 by 14.8-inch base and a 22 lb single-surface capacity. It has no keyboard tray. VIVO's exact-model page and manual.
The manufacturer page lists 1.8 to 16.2 inches of height, while its revision 2.1 manual lists 1.8 to 16.1 inches. Use the manual's more conservative upper endpoint for this comparison, and confirm with VIVO if your standing target depends on that last tenth of an inch. Neither range lowers your keyboard to the original desk.
Consider it when your measured setup needs more surface and payload than the E3 Compact provides, and its higher seated surface still fits. Skip it when you need a keyboard tray that adjusts separately from the monitor platform or a below-desktop tray. The base dimensions start the support check; also verify full support and clearance through movement. VIVO doesn't provide a converter weight in the cited page/manual, so obtain that before completing the desk-load check. These specifications don't apply to the different DESK-V000K or the 36-inch option.
FlexiSpot M7, current 28-inch black: Two tiers moving together
The current FlexiSpot AlcoveRiser M7 page links the M27SB manual for this 28-inch version. It lists a 28.3 by 16.3-inch upper surface and 4.7 to 20.1-inch upper-platform height. Its M27SB manual separates 33 lb on the desktop from 4.4 lb on the keyboard tray. Don't put the page's 37.4 lb headline capacity on the upper surface.
The manufacturer calls for a supporting desk at least 29.5 inches wide by 25.6 inches deep. Its smaller base footprint doesn't cancel that requirement. This is a two-tier example to investigate if you want the screen above the keyboard and can accommodate the stated desk size.
FlexiSpot lists the unit at 23.81 lb, but the tray's numerical height endpoints remain unconfirmed in the linked documentation. Don't enter 4.7 to 20.1 inches as its keyboard range or assume the tray goes below your desk. Get those endpoints from FlexiSpot before making a fit decision. Skip it for a purchase that depends on a proven low seated tray position until that is confirmed. Use the current M27SB documentation, rather than transferring specifications from an older M7 size or off-shelf variant.
Ergotron WorkFit-TX: An independently adjustable, below-desktop tray
The black WorkFit-TX, part 33-467-921, illustrates the feature to look for when your seated offset is negative. Ergotron's dimension sheet shows an upper surface 2 to 19 inches above the desktop and 3 inches of independent keyboard-tray adjustment. The tray can reach below the original desktop. The drawing shows 0.8 to 3.8 inches below at the lowered position, while Ergotron's intro page describes 3.5 inches below. Confirm a close seated fit with Ergotron rather than treating the differing endpoints as a guarantee.
Ergotron's manual specifies a 10 to 40 lb combined payload, with less than 5 lb on the keyboard tray. Its product sheet lists a 58.5 lb converter weight. The minimum payload is part of the check too. The manual calls for a supporting desk wider than 31 inches and deeper than 23.5 inches, with the base supported as shown. The front and tray extend beyond that supporting area; check the full dimension drawing, knee clearance and tray tilt before ordering.
Consider this layout when a below-desktop keyboard position is necessary and the supporting desk can carry the unit plus your gear. Skip it if the substantial added desk load, required depth or minimum payload doesn't suit your setup. A lower full desk may be a simpler fit. The exact black Ergotron WorkFit-TX listing matches this part number; check current availability and the model on the listing before buying.
Compare the complete cost before choosing
A converter keeps the furniture, but it may also need a separate keyboard, mouse, screen-height solution or permitted monitor mount. Compare those additions, delivery and applicable taxes with a complete standing desk, including its top, controls and any accessories you need. A frame-only listing isn't a complete desk comparison.
For the two single-surface examples, current listings are UPLIFT E3 Compact: $149 and VIVO DESK-V000U: $99.99. Confirm the exact configuration and delivered total at checkout. For the other layouts, use the manufacturer's current offer for the documented model.
Choose the converter when you want to keep a suitable desk and it passes every fit check without a chain of workarounds. Choose the full desk when you need the whole work surface to move, a lower seated desktop, more equipment space or a different furniture layout. Choose neither when the existing setup does the job.
If you're replacing the desk, use our standing desk buying guide to compare complete desks and frames, or choose an UPLIFT Desk by layout and seated height. Carry your measured targets into that decision; changing the furniture doesn't remove the need to check fit.
Frequently Asked Questions
Can a standing desk converter lower the keyboard below my desk?
Only if its exact keyboard-tray mechanism is designed to reach below the original desktop. A tray below the converter's upper platform can still be above the desk. Check the tray drawing and its position at the lowered setting; a single-surface converter adds height.
Is a converter better than a new standing desk?
A converter fits the job when you want to keep a suitable existing desk and both keyboard targets, support area, loads and movement clearance work. A full standing desk is the more direct choice when the whole surface needs to move or the old desk's seated height and workspace are the problem. Neither is an automatic comfort improvement.
Can I put two monitors on a converter?
Only when their bases or a permitted mount fit the surface and the documented platform, mount and combined limits cover the complete setup. Include stands or arm weight, movement clearance and the added load on the supporting desk. Monitor count alone isn't a fit check.
What if the product page lists a height range but no keyboard-tray range?
Leave the worksheet's candidate range blank until the manual or manufacturer confirms the keyboard surface's endpoints relative to the existing desk. An upper-platform range, an overall product height or a tray's adjustment travel isn't enough to calculate those endpoints.
Can I use the worksheet for a full standing desk?
For a full desk, calculate each required finished desktop height as target keytop height minus keyboard thickness. Compare those floor-based heights with the selected desk's finished range, including top thickness and any casters. The converter worksheet uses offsets from an existing desktop, so don't enter a full desk's floor-based range into it.